How to Brief Your Venue for a Mobile Hat Bar: Layout, Power, and Safety Checklist
A mobile hat bar can look effortless to guests while requiring very precise coordination behind the scenes. The stronger your venue brief, the smoother the setup, the safer the service window, and the better the guest experience.
That matters even more when the activation is interactive. Unlike static décor or a simple retail pop-up, a hat bar invites browsing, trying on, queueing, conversation, payment, styling, and photo moments all in one footprint. If the venue team only hears “small vendor setup,” they may miss the practical needs that keep everything running cleanly.
Start with a venue brief that is specific, visual, and easy to share
A good brief should give the venue enough detail to approve the setup quickly and support it on event day. Think of it as an operating document, not just a note in an email. The goal is to answer the questions the venue manager, facilities team, security lead, and event planner are all likely to ask before they have to ask them.
That usually means sending one short packet with your footprint, load-in and load-out timing, staffing count, power needs, and safety notes. A simple diagram often saves more time than a long description.
After you introduce the concept, make sure the venue receives these basics:
- Event date and operating hours
- Load-in and teardown timing
- Exact setup footprint
- Staff count and lead contact
- Power request
- Accessibility needs
- Insurance and permit status
- Waste and cleanup plan
One small detail can affect several departments at once. A setup that opens at cocktail hour may need early dock access, lighting support, and a queue plan, all before the first guest arrives.
Give the venue a layout they can approve with confidence
The most useful layout brief does two things at once: it shows where the hat bar will sit, and it shows what will stay clear around it. Venues are not only thinking about aesthetics. They are also looking at aisle width, service routes, fire exits, ADA access, and whether the activation will interrupt catering or entertainment.
A mobile hat bar often works best in a high-visibility zone with natural foot traffic, but not in the middle of a traffic pinch point. Near a lounge, cocktail area, welcome zone, or reception edge is often ideal. Directly beside restrooms, main kitchen routes, or emergency exits is rarely a good fit.
Queue planning deserves more attention than many hosts expect. Guests do not just step up, choose a hat, and leave in thirty seconds. They pause, compare styles, talk with friends, and make design choices. If that wait line has nowhere to go, it will spill into circulation space fast.
Here is a practical planning reference you can share with venues when discussing space:
| Layout Item | Recommended Planning Range | Why It Matters |
|---|---|---|
| Main bar footprint | 10 x 8 ft minimum | Allows table, display, and staff work zone |
| Front guest queue area | 3 to 4 ft depth beyond display edge | Prevents line spill into walkways |
| Side clearance | 2 to 3 ft each side | Supports circulation and safer movement |
| Staff workspace behind bar | 3 to 4 ft clear | Gives room for styling, restocking, and POS |
| Accessible route | 36 in clear minimum | Supports wheelchair access and code compliance |
| Clearance from exits or egress paths | Per venue and fire code, keep fully unobstructed | Protects life safety and speeds approval |
If the venue already has a floor plan, mark your requested placement directly on it. That helps everyone spot conflicts early, especially with bars, buffet stations, stages, dance floors, and photo booths.
Call out the details that shape guest flow
Venues appreciate clear direction when you explain how people will approach, browse, and exit the station. That gives the operations team a chance to recommend a better placement or suggest stanchions, drape, or nearby furniture moves before the room is set.
Use simple language and clear labels in the brief:
- Guest approach: from the main aisle, cocktail space, or entry corridor
- Queue direction: where waiting guests will stand without blocking traffic
- Try-on zone: where guests can pause without backing into the line
- Payment point: where POS devices will be used and where receipts or branded packaging will go
- Finished pickup: where completed hats are handed off so the front display stays open
- Storage area: where extra hats, boxes, and supplies will be kept out of sight
This kind of detail helps the venue see the activation as organized and low-friction, which makes approval easier.
Power planning is simple when you do the math first
Many mobile hat bars use modest power, but modest does not mean automatic. A venue still needs to know what is being plugged in, where outlets are located, whether circuits are shared, and how cords will be managed.
Start with an equipment list and an estimated total draw. In many cases, task lighting, tablets, card readers, a small speaker, and a few charging devices may stay under a standard 120V, 15A or 20A circuit. If the setup includes stronger accent lighting, extra displays, fans, or refrigeration for adjacent hospitality service, the request should be much more specific.
A concise power note in your venue brief should include wattage estimates, plug type, number of outlets needed, and whether one dedicated circuit is preferred.
That can look like this in practice:
- Lighting: LED task or accent fixtures, low draw but important for product visibility
- POS devices: tablets, readers, charging cables, small and steady demand
- Branding elements: lit signage or display features that need clean placement near power
- Optional add-ons: speaker, fan, or chilled hospitality accessory if approved by venue
Ask where the outlets are before finalizing placement. A visually perfect corner can become a problem if the nearest outlet requires cords to cross a main walkway.
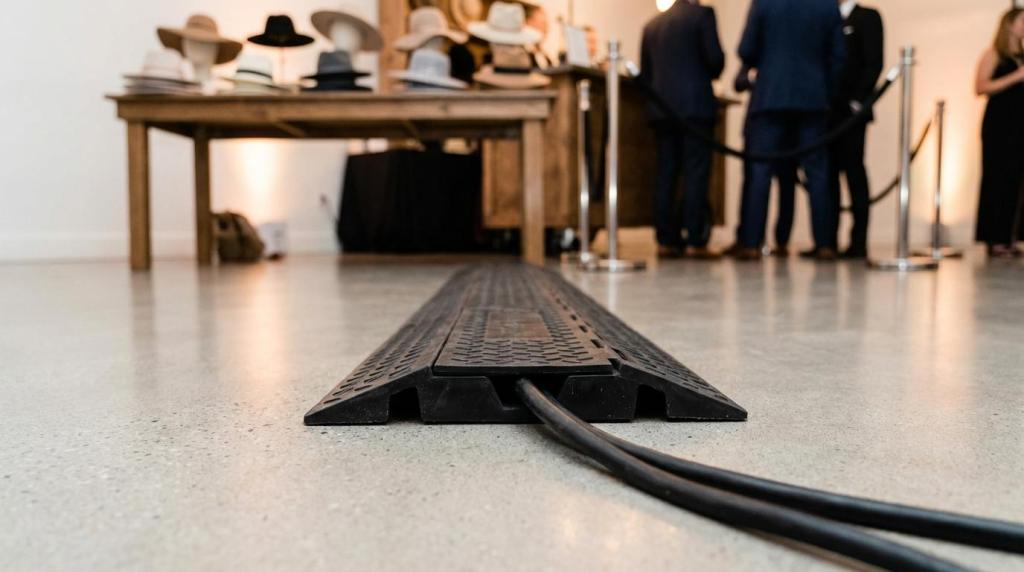
Cords, cable covers, and outlet access should never be an afterthought
Power issues at events are rarely about total wattage alone. They are often about cable paths, overloaded strips, or last-minute extensions laid across open floors. A venue wants to know that your setup will not create trip hazards or force its team into emergency fixes during guest hours.
Request an outlet at or directly behind the activation whenever possible. If cords must travel beyond the immediate footprint, note how they will be secured. Cable ramps or covers are usually the right choice for any floor crossing. Cords that run along walls or behind drape should still be fastened neatly and kept out of doorways.
It also helps to confirm whether the venue requires GFCI protection, in-house electrical review, or advance approval for any extension cords and power strips. Outdoor and damp-area setups deserve even more care.
A polished installation feels invisible to guests.
Safety approval starts long before doors open
Venues are much more likely to support interactive activations when they see that safety has been built into the plan, not added at the end. Your brief should address crowd movement, housekeeping, fire safety, and emergency access in clear, practical terms.
For a hat bar, the major risks are usually manageable: cords, clutter, unstable displays, blocked exits, and queue congestion. None of them are dramatic, but all of them matter. A few well-written lines in the venue brief can prevent most day-of friction.
After outlining your setup, include a short safety section that covers the following points:
- Trip prevention: cable covers, taped transitions, flat rugs, clear walkways
- Fire readiness: no blocked exits, no stored boxes in egress paths, extinguisher access
- Cleanliness: active housekeeping during service, quick spill response, organized storage
- Accessibility: clear route to the activation and reachable service/payment areas
- Emergency response: venue contact, vendor lead, and shutdown procedure if needed
This section does not need legal jargon to be effective. It needs to show that the team has already thought through the operational realities.
Accessibility should be part of the design, not a separate note
A strong venue brief shows how every guest can reach and enjoy the activation. That includes a barrier-free route, practical counter access, readable signage, and space to maneuver comfortably.
If your setup includes a lower service point, mention it. If card readers can be handed to seated guests, say so. If lighting is being added for product visibility, note that it will support easier browsing without creating glare or shadow-heavy corners.
Venues notice when accessibility has been considered early. Event planners do too.
Timing, dock access, and teardown deserve their own section
Load-in is one of the most common stress points for mobile event activations. A brief that skips timing details leaves too much to chance, especially at hotels, casinos, resorts, convention spaces, and large private venues.
Spell out your expected arrival window, number of carts or cases, staff count, and whether you need elevator or loading dock access. If the venue uses booked dock times, reserve them early. If vehicle staging is limited, note how quickly unloading can happen once access is granted.
A simple timeline makes coordination easier for everyone:
- Confirm venue contact and load-in instructions
- Reserve dock or service entrance access
- Share floor plan and power request
- Submit insurance documents and any required permits
- Reconfirm timing 48 to 72 hours before event day
Teardown should be just as clear. Venues want to know when the area will be struck, how waste will be removed, and whether guest traffic will still be active nearby.
Paperwork builds trust faster than long explanations
For many venues, the fastest path to approval is not a longer pitch. It is complete paperwork. If insurance, permits, and operational details are ready early, the venue team can focus on placement and logistics rather than chasing missing items.
Depending on the event and location, paperwork may include a certificate of insurance, additional insured language, business licensing, temporary event permissions, and any venue-specific vendor forms. If food or alcohol is not part of the activation, say that clearly. It removes one major area of confusion right away.
Keep copies on-site as well. A printed packet or digital folder that the lead staff member can access quickly is often enough to answer day-of questions without delay.
The best brief helps the venue say yes
When a venue receives a clear plan for layout, power, safety, and timing, the mobile hat bar stops looking like “one more vendor” and starts looking like a well-managed experience. That shift matters.
It gives the operations team confidence. It gives planners fewer variables to manage. Most importantly, it gives guests a space that feels inviting, polished, and easy to enjoy.
And that is exactly what a great interactive activation should do.